10 Creative Uses for Frosted Window Film in Home Decor
Frosted window film is a type of window covering that allows light to pass through while obscuring the view from the outside. It is commonly used for privacy in bathrooms, bedrooms, and other areas where people want to maintain their privacy. In addition to its practical use, frosted window film can also be used to enhance the look of a room and add a unique decorative touch.
Here are some benefits of using frosted window film:
- Provides privacy without sacrificing natural light
- Can reduce glare and heat from sunlight
- Easy to install and remove
- Affordable compared to other window treatments
Despite its many benefits, frosted window film is often overlooked as a decorative option. In this blog post, we’ll explore 10 creative uses for frosted window film in home decor. From creating a faux stained glass effect to adding a decorative border to mirrors, we’ll show you how to make the most of this versatile material.
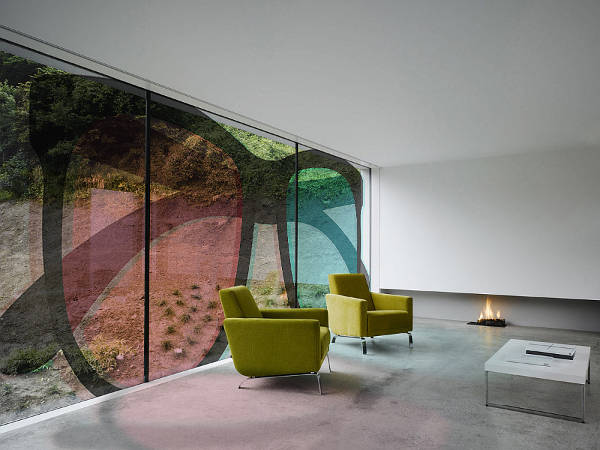
1. Create a Geometric Window Wall
If you’re looking to add a modern touch to a room, a geometric window wall may be just the thing. Here’s how to create one using frosted window film:
- Measure the window: Measure the height and width of the window you want to cover. This will help you determine how much frosted window film you need to buy.
- Choose a pattern: There are countless geometric patterns you can use, from simple triangles to more complex hexagons. Consider the size of your window and the overall look of the room when choosing a pattern.
- Cut the frosted window film: Using a straight edge and a utility knife, cut the frosted window film into the desired shape and size. You can create individual shapes and place them on the window, or cover the entire window with one large piece.
- Apply the film: Clean the window with a window cleaner and allow it to dry completely. Peel the backing off the frosted window film and apply it to the window, smoothing out any bubbles as you go.
- Repeat: If you’re covering a series of smaller windows, repeat steps 1-4 until all windows are covered.
Here are some examples and inspiration for different patterns and color combinations:
- Triangles in shades of gray
- Hexagons in shades of blue
- Diamond shapes in metallic gold
- Circles in shades of green
- Chevron pattern in shades of pink and purple
By using frosted window film to create a geometric window wall, you can add a unique and eye-catching element to any room.
2. Add a Faux Stained Glass Effect
If you want to add some color and interest to a window, consider creating a faux stained glass effect using frosted window film and colored vinyl. Here’s how:
- Choose a design: You can either create your own design or use a pre-made template. Keep in mind that simpler designs will be easier to execute.
- Cut the vinyl: Use a vinyl cutter or a pair of scissors to cut the colored vinyl into the desired shape and size.
- Apply the vinyl: Once you have cut out all of the shapes, peel off the backing and apply the colored vinyl to the frosted window film. Be sure to smooth out any bubbles or wrinkles as you go.
- Apply the film: Clean the window with a window cleaner and allow it to dry completely. Peel the backing off the frosted window film and apply it to the window, making sure that the colored vinyl is facing out.
Here are some examples and inspiration for different designs and color combinations:
- A simple geometric design in shades of blue and green
- A floral design in shades of pink and purple
- A modern abstract design in shades of yellow and orange
- A classic Tiffany-style design in shades of red and blue
By using frosted window film and colored vinyl, you can create a beautiful faux stained glass effect that will add a unique and colorful touch to any room.
3. Create a Privacy Screen or Room Divider
If you have an open floor plan or want to create some privacy in a shared space, a privacy screen or room divider can be a great solution. Here’s how to create one using frosted window film:
- Choose a frame: You can use an existing frame or build one from scratch using wood or PVC piping. The frame should be sturdy enough to support the weight of the frosted window film.
- Measure the frame: Measure the height and width of the frame to determine how much frosted window film you need to buy.
- Cut the frosted window film: Using a straight edge and a utility knife, cut the frosted window film into the desired shape and size. You can create individual panels or cover the entire frame with one large piece.
- Apply the film: Clean the frame with a damp cloth and allow it to dry completely. Peel the backing off the frosted window film and apply it to the frame, smoothing out any bubbles as you go.
- Install the frame: Once the frosted window film is attached to the frame, you can install it as a privacy screen or room divider.
Here are some examples and inspiration for different patterns and designs:
- A simple white frame with frosted window film panels in a geometric pattern
- A natural wood frame with frosted window film panels in a leaf or floral pattern
- A modern black frame with frosted window film panels in a bold graphic design
- A colorful PVC frame with frosted window film panels in a mosaic or stained glass pattern
By using frosted window film to create a privacy screen or room divider, you can add privacy and visual interest to any space.
4. Add a Decorative Border to Mirrors or Glass Doors
If you want to add some interest to a plain mirror or glass door, consider using frosted window film to create a decorative border. Here’s how:
- Choose a design: You can create a custom design or use a pre-made template. Keep in mind that simpler designs will be easier to execute.
- Measure and mark the glass: Measure the height and width of the glass and use a straight edge and a pencil to mark the edges of the border.
- Cut the frosted window film: Using a straight edge and a utility knife, cut the frosted window film into the desired shape and size. Be sure to leave a small margin around the edges of the border.
- Apply the film: Clean the glass with a window cleaner and allow it to dry completely. Peel the backing off the frosted window film and apply it to the glass, making sure that the edges of the film line up with the marks you made earlier.
Here are some examples and inspiration for different designs and shapes:
- A simple rectangular border around a bathroom mirror
- A curved border around a bedroom mirror
- A scalloped border around a glass door
- A geometric border around a living room mirror
By using frosted window film to add a decorative border to mirrors or glass doors, you can elevate the look of your space and add some visual interest to an otherwise plain surface.
5. Create a Unique Backsplash
A backsplash is an important part of any kitchen or bathroom, but it doesn’t have to be boring. By using frosted window film, you can create a unique backsplash that’s both functional and beautiful. Here’s how:
- Choose a design: You can create a custom design or use a pre-made template. Keep in mind that simpler designs will be easier to execute.
- Measure and mark the wall: Measure the height and width of the wall where you want to install the backsplash and use a straight edge and a pencil to mark the edges of the design.
- Cut the frosted window film: Using a straight edge and a utility knife, cut the frosted window film into the desired shape and size. Be sure to leave a small margin around the edges of the design.
- Apply the film: Clean the wall with a mild soap and water and allow it to dry completely. Peel the backing off the frosted window film and apply it to the wall, making sure that the edges of the film line up with the marks you made earlier.
Here are some examples and inspiration for different patterns and designs:
- A simple geometric pattern in a neutral color for a modern look
- A floral pattern in a bright color for a fun and feminine touch
- A mosaic pattern in a mix of colors for a bold statement
- A custom design that incorporates your favorite colors and shapes for a personalized touch
By using frosted window film as a unique backsplash, you can add a stylish and functional element to your kitchen or bathroom that’s sure to impress.
6. Add a Decorative Touch to Shower Doors
Shower doors can be a bland feature in a bathroom, but by using frosted window film, you can add a decorative touch that complements your decor. Here’s how:
- Choose a design: You can create a custom design or use a pre-made template. Keep in mind that simpler designs will be easier to execute.
- Measure and mark the glass: Measure the height and width of the glass and use a straight edge and a pencil to mark the edges of the design.
- Cut the frosted window film: Using a straight edge and a utility knife, cut the frosted window film into the desired shape and size. Be sure to leave a small margin around the edges of the design.
- Apply the film: Clean the glass with a mild soap and water and allow it to dry completely. Peel the backing off the frosted window film and apply it to the glass, making sure that the edges of the film line up with the marks you made earlier.
Here are some examples and inspiration for different designs and shapes:
- A simple diagonal stripe pattern for a modern touch
- A floral pattern for a feminine and romantic look
- A geometric pattern for a bold statement
- A custom design that incorporates your favorite colors and shapes for a personalized touch
By using frosted window film to add a decorative touch to shower doors, you can elevate the look of your bathroom and create a more interesting and visually appealing space.
7. Create a Cozy Reading Nook
Frosted window film can be used to create a cozy reading nook by providing privacy and a soft, diffused light. Here’s how:
- Choose a location: Look for a corner or alcove that’s tucked away from the main living area, ideally with a window that lets in natural light.
- Apply frosted window film to the window: Apply frosted window film to the window to provide privacy while still allowing light to filter in. You can choose from a variety of patterns and designs to suit your style.
- Add seating: Add a comfortable chair or bench to the nook, along with soft cushions and throws.
- Accessorize: Add a side table or bookshelf to store your reading material and a lamp for additional lighting.
Here are some examples and inspiration for different patterns and designs:
- A floral pattern for a cozy and feminine nook
- A geometric pattern for a modern and minimalist look
- A custom design that incorporates your favorite colors and shapes for a personalized touch
By using frosted window film to create a cozy reading nook, you can transform a forgotten corner of your home into a comfortable and inviting space that’s perfect for curling up with a good book.
8. Create a Faux Window
Frosted window film can be used to create the illusion of a window on a blank wall, adding depth and interest to your space. Here’s how:
- Choose a location: Look for a blank wall that could use a focal point, such as a basement or a room with limited natural light.
- Measure and mark: Measure the size of the window you want to create and mark the dimensions on the wall using a pencil and level.
- Apply frosted window film: Apply frosted window film to the marked area, ensuring that it’s smooth and free of bubbles.
- Add window frame and accessories: Add a window frame and sill to complete the illusion. You can also add curtains or blinds to make the faux window look more realistic.
Here are some examples and inspiration for different designs and shapes:
- A rectangular window with a white frame for a classic look
- A circular window with a metallic frame for a modern touch
- A custom design that incorporates a favorite landscape or cityscape for a personalized touch
By using frosted window film to create a faux window, you can add visual interest and depth to any room, even those without real windows.
9. Use Frosted Window Film as Art
Frosted window film can be used as a creative and unique form of wall art. Here’s how:
- Choose a location: Look for a blank wall that could use some visual interest, such as a hallway or living room.
- Decide on a design: Choose a design that speaks to your personal style, whether it’s a nature-inspired motif or a geometric pattern.
- Apply frosted window film: Apply frosted window film to the wall, ensuring that it’s smooth and free of bubbles.
- Frame the artwork: Add a frame to complete the look. A simple white frame or a metallic frame can add a polished touch to the frosted window film artwork.
Here are some examples and inspiration for different designs and shapes:
- A tree branch pattern for a nature-inspired look
- A Moroccan tile pattern for a global-inspired touch
- A polka dot or chevron pattern for a modern feel
By using frosted window film as art, you can add a unique and creative touch to any room in your home. Plus, it’s a great option for those who may not have the budget or space for traditional wall art.
10. Create a Unique Headboard
A frosted window film headboard can be a creative and stylish addition to any bedroom. Here’s how:
- Choose a design: Consider a design that complements the style of your bedroom. A classic damask pattern or a bold geometric design could work well.
- Measure the space: Measure the width and height of the space where you want to place the headboard.
- Apply frosted window film: Apply the frosted window film to the wall where you want to create the headboard. Make sure the surface is smooth and free of bubbles.
- Cut the design: Use a sharp utility knife to cut the design of your choice into the frosted window film. Take your time and make sure to cut with precision.
- Add lighting: For added ambiance, add string lights or LED strip lights behind the headboard.
Here are some examples and inspiration for different designs and shapes:
- A simple, modern geometric pattern for a contemporary feel
- A delicate floral design for a romantic touch
- A bold graphic pattern for a dramatic statement
By using frosted window film to create a headboard, you can add a unique and personalized touch to your bedroom. Plus, it’s an affordable and easy DIY project that can be completed in just a few hours.
Conclusion:
Frosted window film is a versatile and affordable material that can be used in a variety of creative ways to enhance your home decor. From adding a faux stained glass effect to creating a cozy reading nook, the possibilities are endless. Here’s a quick summary of the 10 creative uses we’ve covered in this post:
- Create a geometric window wall
- Add a faux stained glass effect
- Create a privacy screen or room divider
- Add a decorative border to mirrors or glass doors
- Create a unique backsplash
- Add a decorative touch to shower doors
- Create a cozy reading nook
- Create a faux window
- Use frosted window film as art
- Create a unique headboard
We hope these ideas have inspired you to try something new with frosted window film in your own home. With a little creativity and some basic DIY skills, you can transform any space into a personalized and stylish retreat. For additional resources and inspiration, check out our website or social media channels. Thanks for reading, and happy decorating!